

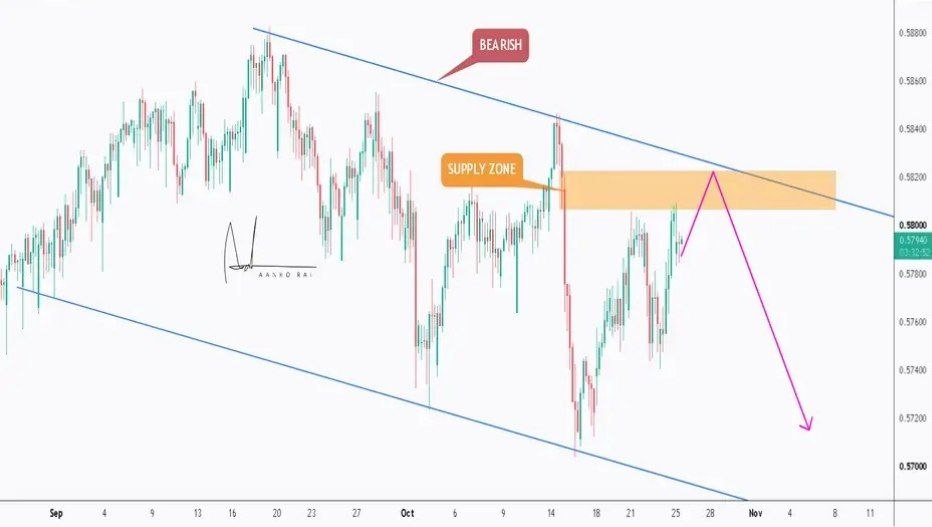
The AUDCHF currency pair is showing a bearish technical structure within a descending channel. Price is currently recovering toward an important supply zone near the upper boundary of the channel, where sellers may attempt to regain control.
Although the recent price action shows a short-term recovery, the broader structure remains bearish as long as price continues to respect the descending channel and fails to establish a sustained breakout above resistance.
Current Market Structure
The chart illustrates a descending channel formed by two downward-sloping trendlines. Price has generally moved lower between these boundaries, creating a bearish structure.
- Currency pair: AUDCHF (Australian Dollar / Swiss Franc).
- Market bias: Bearish while the descending channel remains intact.
- Current price action: A recovery toward the upper channel boundary.
- Key technical area: The highlighted supply zone.
- Potential direction: Further downside if resistance holds and bearish momentum returns.
Key Supply Zone
The orange-highlighted area represents a potential supply zone, where selling pressure previously emerged. This region overlaps with the upper boundary of the descending channel, making it an important area to monitor.
If price enters this zone and fails to move higher, sellers may regain control. A bearish rejection, a failed breakout, or the formation of a lower high could provide additional evidence of selling pressure.
However, reaching the supply zone alone does not confirm a reversal. Traders should wait for price-action confirmation before considering a trade.
Potential Bearish Trading Scenario
- Wait for price to approach supply: Monitor the highlighted zone near the upper boundary of the descending channel.
- Look for bearish confirmation: Watch for rejection candles, a failed breakout, or a lower high that indicates weakening buying momentum.
- Confirm renewed selling pressure: A move below nearby short-term support may strengthen the bearish continuation scenario.
- Define trade invalidation: Establish a stop-loss level above the relevant swing high or supply-zone boundary, according to the trading plan.
- Monitor downside targets: Potential areas of interest include the previous swing low and the lower boundary of the descending channel.
What Could Invalidate the Bearish Setup?
The bearish outlook may weaken if AUDCHF breaks above the supply zone and establishes sustained price action above the upper channel boundary. A confirmed breakout followed by a successful retest could indicate a possible change in market structure.
Traders should therefore avoid assuming that every test of resistance will result in a decline. The market could reject the zone, consolidate, or break higher.
Important Points to Monitor
- Whether the supply zone attracts renewed selling pressure.
- Whether the descending channel continues to contain price.
- Whether a lower high forms near resistance.
- Whether nearby support breaks following a bearish rejection.
- Whether a sustained breakout invalidates the bearish structure.
Trading takeaway: AUDCHF remains bearish within the descending channel shown in the chart. A confirmed rejection from the supply zone could support a potential selling scenario, while a sustained breakout above resistance would require reassessing the bearish outlook.
Comments (0)
No comments yet. Be the first to comment.